Showing posts with label centers. Show all posts

Tuesday, July 10, 2012

Nets Full of Fish

VBS- "By the Sea" lesson- Nets full of fish
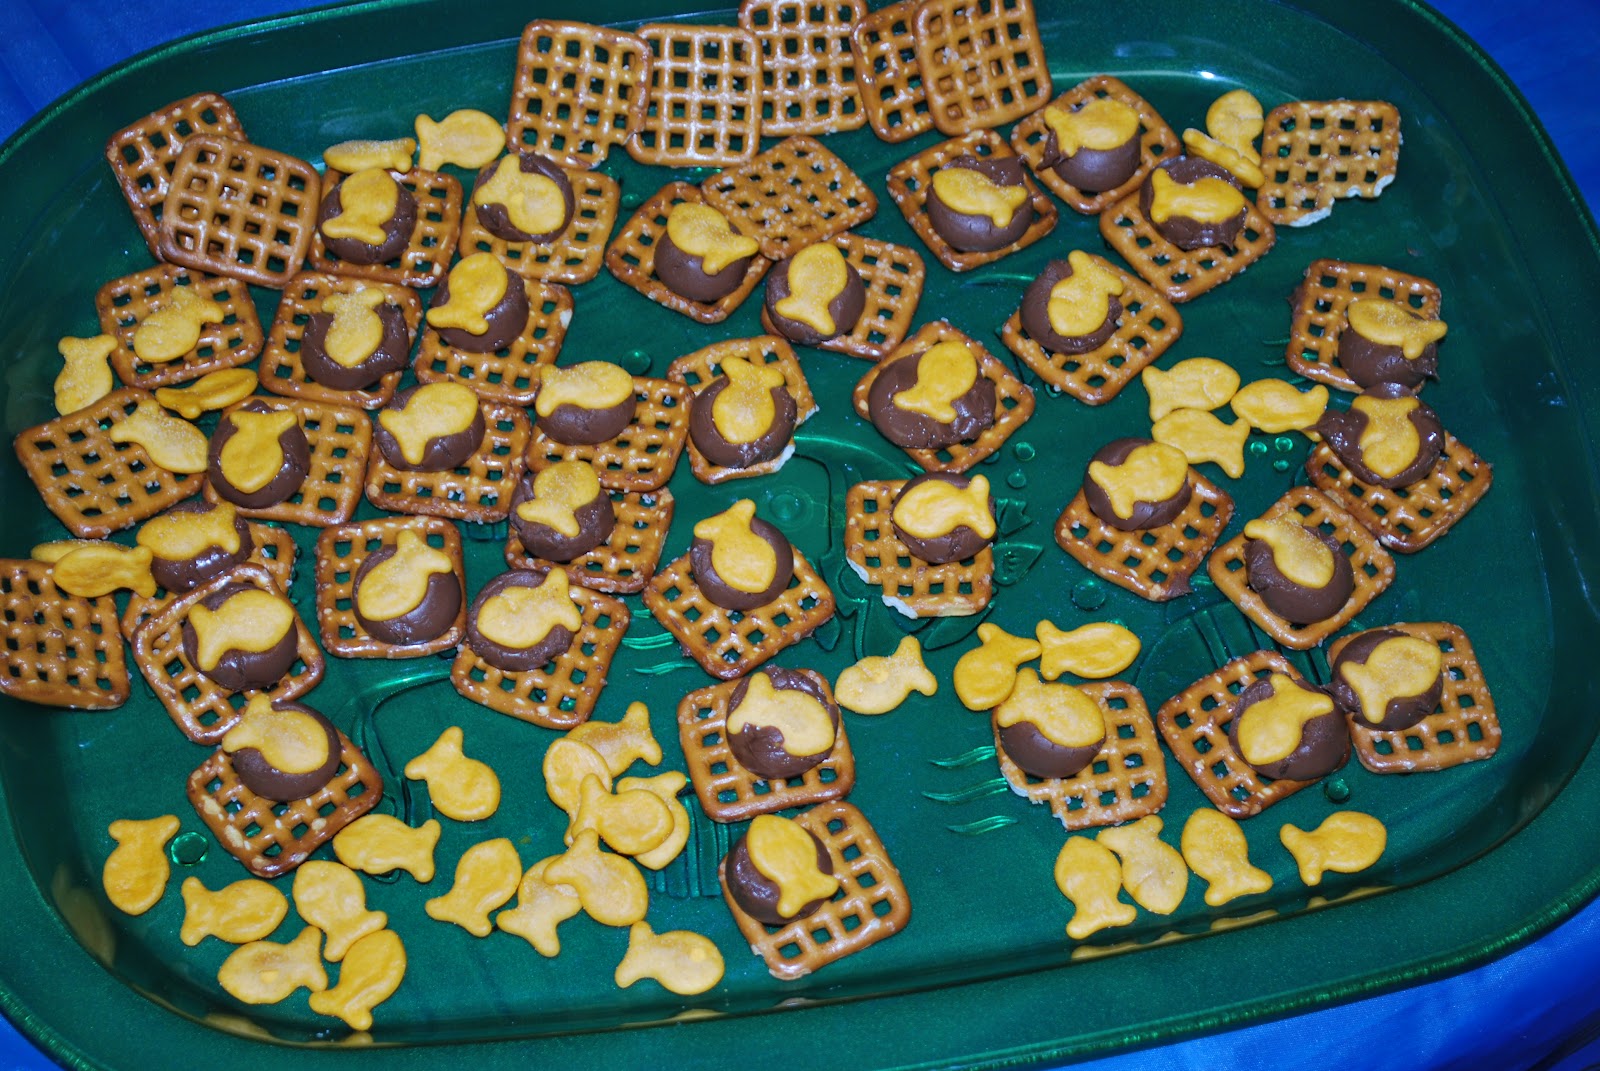

snack- nets with fish made using waffle pretzels, hershey kisses, and goldfish. Place kiss on pretzel and melt the for a few minutes in the oven. take out and press fish into chocolate. That's it!! So simple and tasty! Found this idea on Pinterest!
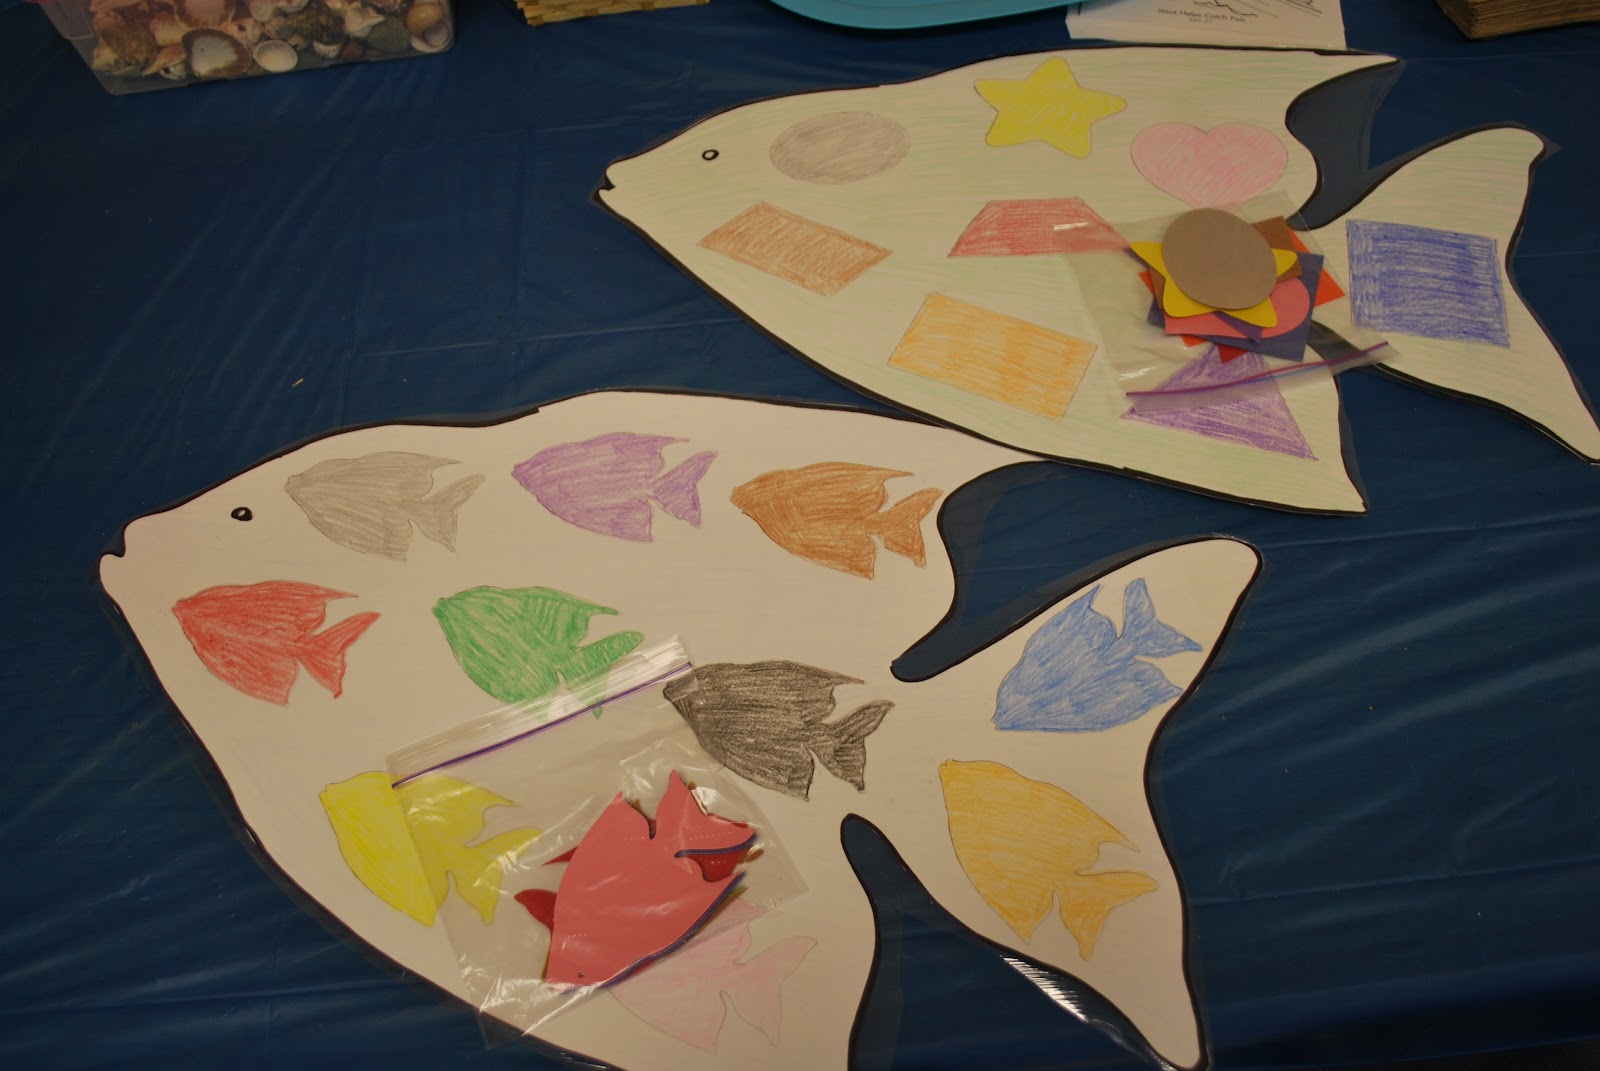

easy center for 2 year olds. Match colors and shapes


Fish matching center. Found foam fish on oriental trading


also found this craft idea on Pinterest. Used pieces of a laundry bag for the net, mini die cut fish, and jumbo popsicle sticks. 


Tune: "If You're Happy and You Know It" 

The apostles caught a bunch of fish
Jesus said, "cast your nets on the other side."
The apostles caught a bunch of fish.

Jesus Calls the Apostles

VBS "By The Sea" Lesson- Jesus calls the apostles to be fishers of men! 

snack-  fishing poles using pretzel rods, pull apart twizzlers, and gummy fish! 'Glued' the twizzler and fish with almond bark. 


The 2 year olds counted the apostles. An upside egg carton works perfectly with there being 12 places to stick apostles on popsicle sticks! Also used the poster board with apostles while singing the apostles song and then used it in a matching center. Kids matched the smaller apostles with the one on the poster board. 


Tune: "If You're Happy And You Know It"

One day Jesus called some fisherman.
He called "come follow me"
They left their nets and went,
One day Jesus called some fisherman.


To go along with our "by the sea" theme the kids counted sea shells in one center


They also went fishing in a pool filled with tissue paper and fish with paper clips attached. I hot glued a heavy duty magnet to the end of a string attached to a pole for them to fish with.

Friday, December 23, 2011

Golden Calf Centers

Some of my favorite class activities came from this lesson.  We first talked about how Moses came down from the mountain and was so mad when he saw that the Israelites had made a golden calf.  He was so mad that he threw the 10 commandments down and smashed them everywhere.  So, I let the boys throw down graham crackers (relating to the snack the night before) on some paper.  At first, they were a little hesitant, but then got right into it.  They did a great job pretending to be mad throwing their graham crackers down.

Then, we talked about how Moses melted the golden calf down and made it into powder.  I had a golden calf (see picture at the bottom of this post) and put it over the campfire you see in this picture.  I switched the golden calf (that I had put in the pot that you also see in the picture below) and showed them how the fire made it into powder.  I had put UNsweetened lemonade powder in the pot before class began.  I showed them how Moses took the powder and poured it into their drinking water for the children of Israel to drink.  I had a pitcher of water and poured our powder into the water, mixing it up.  Then, I gave each child a cup with some of the water in it.  We had talked about how the water was very bitter for them to drink, and this showed them how bitter it was.


Their faces were so funny drinking the bitter water!!! One child actually liked it!! Go figure!

Then, we made golden calves.  I used the die cut machine again to make 3D golden calves for them to take home.


Of course, we had to have a picture of them with the golden calf - which I actually took on Tuesday night because I had to get their paper bag scrapbooks ready to give them this night.  Diane had found a blow up calf and spray painted it gold. They loved it!

We had a great time learning about Moses this year at VBS!

10 Commandments Activities

I don't know where all my 10 Commandment center pictures are.  I guess that is what I get for FINALLY putting them up in December when it happened in June!!! Oh well!!!  We did have some great centers!  The first being our drama center.  I loved how each night the mountain stayed the same - yet changed!!!  For the mountain of the Lord, we added clouds and lighting bolts to the top and let the kids climb up the mountain to receive the 10 commandments.  I love how the 10 commandments are about as big as the kids!!! Ha Ha! They did NOT care!


We also played "Find God's 10 laws" over and over and over again.  Our church as a tablet die cut so I made 10 of them to hide all over the room.  We would count them as we found them and would remind ourselves that God gave the Israelites 10 laws.  This, of course, was a huge hit!

Crossing the Red Sea Centers

To help us review the Red Sea lesson, we did the following centers.  The kids really enjoyed these activities.

The first thing we did was allowed them to make their own pillar of cloud and fire to take home.  This especially was great after the big hit it was during class.


Then, we gave each a child a SNACK size Zip-loc bag.  We put a little bit of toothpaste (usually a line of toothpaste squeezed at the very bottom of the bag) at the bottom of the bag and sealed it up.  Then we let them spread the toothpaste all over the bag.  Then we talked about how the Israelites crossed on fry land.  The children took their fingers and separated the toothpaste at one point on the bag to separate the toothpaste.  Then, we found footprint stickers for them to place on the dry land.


Their favorite center was the drama center where we let each child be Moses and separate the Red Sea.  Our Burning Bush mountain, turned into the mountain where Moses stood to cross the Red Sea.  Each child got to stand up on the mountain with a staff.  My helpers were on the floor by plastic blue tablecloths and when "Moses" raised his rod, the helpers raised the "waters."  The children who were not Moses were able to cross on dry land and they LOVED it!!!!!


They wanted to do this the next night as well!!

Sunday, January 9, 2011

Healing of the Lame Man

I don't teach below Kindergarten often, but, when I do, I try to do a lot of activities to keep the kids up and moving!!!!  When I was teaching the three year olds about Paul, these are some of the activities we used for the lesson.  This gate had been made for a VBS lesson.  We try to save as many of these things as possible so we can reuse them year after year.  I found the mat from Oriental Trading - in their beach section!!!  The kids loved that part of it!  We let each child that wanted to be the lame man on the mat.  The rest of the class would sing the song that went with the lesson while the child who was lame became well.  We did this COUNTLESS times!!!

One of the things we did when they came into class was to begin coloring their story telling figures. I took these same figures to teach the lesson later.  They worked on coloring them and we would talk about what we thought the lesson would be about.  It is always fun to hear their thoughts!

This is how I used them in the lesson.  The kids love the sand box.  I usually let them touch the sand after the lesson if they sit still through it.

This was one of my favorite lessons to teach and there are so many lame man stories you can use these ideas with - Jesus, Peter and Paul!!!!

Saturday, January 8, 2011

Paper Bag Sheep

We used a white lunch sack to make this cute little sheep for a lesson on David being a shepherd.  It was so easy to make and the kids LOVED them!!!!  Take a lunch sack. Stuff it with anything you have.  We used newspaper.  Fold over the ends and staple.  You may even want to tape the end to the bag.  Attach the head (We used a lamb mask pattern.) to the bag with glue or masking tape.  Cut four legs from white paper and tape to the bottom of the bag.  You can add cotton balls all over the sheep or one for the tail.  We made one for each child.  They were able to take one home at the end of the lesson.  We used them in the drama center.  The kids would collect all the sheep from all over the room and put them in the sheep corral.

You can also use these sheep for the parable of the lost sheep, as well as turning it into any animal you may need.

Sunday, January 2, 2011

Centers from a Magazine in a Box


If you don't have room to put a big board for centers anywhere, use a box instead.  Cover the box with contact paper.  Get your articles and games together and laminated.  Stick them in the box and you are ready to go!

Using Magazines to Make Centers

My mom and I (along with others I know) have been making centers out of magazines for years now.  I especially like to use the Discovery magazine that Apologetics Press puts out.  I would get two of each magazine - it is easier that way.  You can cut out articles for the students to read and then make games to go with them.  The magazines come with some games that you can just laminate and you are ready to go!  Have your students use a dry erase marker and you can wipe it off easily with a wet cloth, nail polish remover or alcohol.  


Kids are not getting creation in school, so they need to get it somewhere!!!

Creation Blocks

I did not make these, but have wanted to!!! So, when I saw them made, I took a picture of them to share with you because who knows when I will have them made!  One reason I love these is because you can do so many things with them!  Save the square boxes of Kleenexes and cover them with bulletin board paper.  Find numbers and pictures of the different things made on each day (as seen in the picture).  You can place one number on each box or 6 numbers on one box (one on each face).  Possibilities are numerous now!!!  If you use one number for each box, have your students place them in the correct order and review what was made on each day.  If you use one box for all 6 days, have each student roll the box and whatever number comes up have them tell you what was made on that day!

Monday, December 27, 2010

Books of the Bible Visual

When my daughter was in preschool, her teacher used this shelf to teach the kids the books of the Bible and the divisions in the Bible.  The kids love this and it helps them to visualize the different divisions of the Bible.  Each book of the Bible is made of a block of wood.  The blocks are painted one color for each division of the Bible.  On the sides of the blocks of wood are the names of the books of the Bible.
On the shelves are listed the divisions of the Bible so kids can take the blocks of wood and place them on the shelves in the right divisions.  This is a great tool for ALL ages!
In my kindergarten class, we use this as we introduce the books of the Bible.  We will add the blocks of books 2-3 each week.  As we add the blocks, we talk about the divisions and why they are named that name.

Thursday, October 14, 2010

Creation Review/God Made People

This quarter the 2,s have been learning about creation. This week they learned about Day 6 and that God made people. They did animals last week! I found some review/center ideas online that I could just print off, cut out and use. No coloring was required (with a color printer) so it took very little time to prepare. I did laminate everything for durability.

Used this as a whole group review. I found this activity at www.christianpreschoolprintables.com It could be used with older kids by letting them match pictures to the correct day all by themselves. With the 2,s I let them hold the pictures and then as I talked about each day we looked to see who was holding the correct picture. They would then come add it to the correct spot. They like having something hold! They did very well with this activity and were so cute studying their pictures to see who was holding what I was describing!


Used this next game as a center for the kids to match the pictures. Found this at www.sundayschoolresources.com.


For our snack/take home we made these marshmallow people. I put them in a bag labeled "Day 6- God Made People" The kids enjoyed eating the parts while making one to take home! I found this idea here! The internet really is a great resource for teaching the bible to children!!

Saturday, October 9, 2010

Zaacheus

This is a great multiple use idea for the lesson of Zaacheus, again from the lady at Campbell Street.  You could use a toilet paper roll and half of a green paper plate to make the tree.  Find a picture that would represent Zaacheus.  You can choose to do this craft as a class and send it home.  You could also make a number of these for a center game to review the story of Zaacheus.  Write the questions on the trees and answers on Zaacheus.  The kids would love playing this game!

Saturday, July 4, 2009

Elijah and Elisha Review

Elijah and Elisha are tough to keep straight - even for adults. In the 4 year old class, they end their time there learning about these two men but there is still some confusion. So, for our new Kindergartners, we use this to help us ALL keep these two important men straight.

We use two square Kleenex boxes one for each man (see this post). Then we made a poster board for each man as well (see pictures below).


In each Kleenex box, we placed pictures that represented each story that was taught on each man. We would pull the picture out of Elijah's box and review the story. Then, we would place the picture on the Elijah board. We would do the same thing for Elisha.
To do a complete review, we would place all the pictures in one box and as we would take the pictures out, the students would tell us which man it belonged to and we would let them place it on the appropriate poster.
Later, it would be a center game for the students to play as they came into class.

Saturday, March 28, 2009

What Would You Do Wednesdays? Ice Tray

A new section of this blog and we need your help! Leave comments on how you could use these different in your classroom. We will get you started but we want you to share your ideas!

1. Use as a button toss game
2. Use as a matching game -place descriptions in the holes and have the students place the word on top of the description.

Thursday, January 15, 2009

Trash-Filled Thursdays - Milk Carton Lids II

This is a great way to review memory verses with older students. Use your saved milk jug lids for this activity. On a poster board, write out the memory work you are wanting your students to learn, leaving blanks for missing words. Write the missing words, one on each milk jug lid. Laminate the poster board so you can use it for a long time. In your classroom, have the students place the milk jug lids with words in the correct blanks. Let them have you check it when they are done. You can make this as easy or as hard as you wish.

Wednesday, January 14, 2009

Puppet Theatre

My students have loved this puppet stage for years. It is made from a science fair tri fold board. You can find them at Wal-Mart and Hobby Lobby (they will run these 1/2 off, so be on the look out!). I simply cut a window from the middle panel with an exacto knife. Using remenants of fabric, I added curtains. All done! We are ready to go.
Oriental Trading carries sets of religous puppets that will fit on a small child's hand and then easily stores in a rubbermaid container.
I use this as a center at the beginning of class time. The students are told to use the puppets to recreate the Bible stories we have learned. This is a very popular center with my kids and can be a great reteaching tool. When a child can put a Bible story in their own words, they have got it!

Tuesday, December 23, 2008

From Worksheet to Game - Counting Games


These worksheets are found in the book Big Book of Kindergarten Puzzles and are so easy to turn into center games. Find the counting puzzles in the book. These puzzles take Bible stories and give the students things to count that relate to the story.
I chose the ones I wanted and enlarged the pictures on a copy machine as big as I wanted them. Some I had to cut and tape together and once I did that, I colored the pictures.
Glue the pictures to construction paper.
Laminate.
Place the boards on cookie sheets (this is not required).
Using magnetic numbers (you can find these on the 88 cent aisle at Wal-Mart), the students count the items and place the number beside the item they counted.
These games are so easy to make and help the students to review the Bible story as well their counting skills. You can review the Bible story with your students as you check the game with them.

Bible Word Game

Sandy made this game to go in her first grade classroom. She found the idea from Ideashop magazine and the ideas are many!!
Find a pattern (like the clown above) to use that you like.
Enlarge it to a poster size or large construction paper size.
Color it, if you desire.
Using a circle template (a milk lid works well) draw circles on the large pattern.
On different colored construction paper, draw circles as well.
At your computer, type words you want your students to review and remember.
You will want one word for each circle you made on your pattern.
From this point there are different ways you can do the game:
For younger children: Copy two copies of the words you typed. Glue one set to the pattern and one set to the construction paper circles. Laminate both for durability. Your students can play this game at a center where they match words. When you check it, you can review the words and what they mean with the students at that time.
For older children: You will want to keep the list of words you already made. Take the words from that list and scramble the words. You will have two lists - one of unscrambled words and one with scrambled words. Cut the scrambled word list and place a scrambled word in each circle. Cut the unscrambled words and place an unscrambled word in each construction paper circle. Laminate both for durability. Your students can play this game at a center where they will match the unscrambled words to the scrambled words. When you check it, you can review the words and what they mean with the students at that time.

LinkWithin

Related Posts Plugin for WordPress, Blogger...